Logan Severance
Introduction
This guide will walk you through how to configure a OrangePi Zero 3 (henceforth known as OPZ3) as a mass storage device, and then have that virtual mass storage device availble via SMB (samba). My use case for this was to have it connected to my Elegoo Saturn Mono Resin Printer so I could add and remove print files without having to bother with a physical USB drive. If this is also your use case, feel free to follow this guide to a T. Otherwise this guide will also work for you, but there may need to be some changes you make along the way. Also if you are using this for the same printer as me and have a FDM 3D printer, feel free to print these files to attach the OPZ3 to the printer.
Materials Needed
- Orange Pi Zero 3 (or whatever OrangePi device you plan on using.)
- A way to power the device. You cannot use the USB C port just for power, as this port is also needed to emulate the mass storage. Refer to the next section "Powering the OPZ3" for suggested options.
- A micro SD card. Ideally something 16GB or larger. Faster speeds will help with some load times when performing setup, but in the long run it won't make a huge difference.
- A way to connect that micro SD card to a computer.
- USB C to USB A cable capable of transfering data. (Or whatever USB cable you will need to fir your project, just ensure it is capable of sending data.
- I would always suggest putting a device like this in some form of case. Either order one or 3D print one yourself (like the ones linked above)
Powering the OPZ3
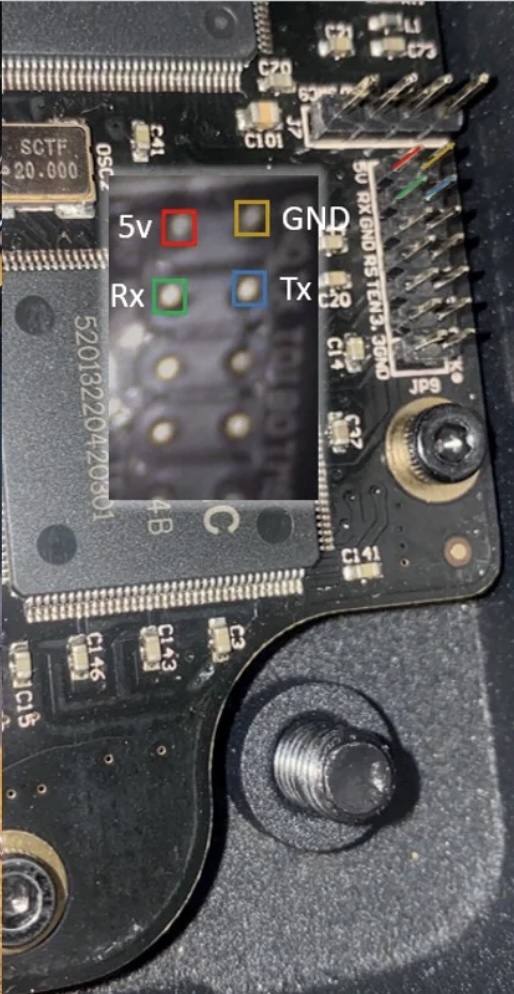
First thing we need to do is power the OPZ3. Unfortunatly the USB C port on the board is the port we HAVE to use to emulate a mass storage device, so just plugging in a powered USB C cable won't work. The USB A port is only compatable in host usb mode, so we can't use that either (only works with keyboards, mice, etc). Therefore there are two ways we can go about powering the OPZ3. The first option is through a USB C adaptor like this. The second way is through the GPIO pins. The OPZ3 takes 5V power in, so if you have a reliable 5V source of power, you can connect it to the associated pins. If you are following along to use this with a Elegoo Saturn, you are in luck, as we can use the 5V pins on the motherboard of the Saturn to power our OPZ3. (Just note that turning off the printer will also turn off the OPZ3). You will need 4 jumper cables to do this, I used the ones found here. Carefully analyze the the diagram and pictures below, and wire the OPZ3 the same way. The Rx and Tx cables are supposed to be switch around on the OPZ3. If you have already printed the sideplate, remember to run the cables through the hole in the side.

Once you have it wired up, I would suggest powering the OPZ3 to ensure it is getting adequate power before moving onto the next step.
Creating the build enviroment
The next step we have to do is compile our own firmware/Linux Image for the OPZ3. Unfortunatly, the official OS provided by OrangePi does not have the USB Mass Storage drivers enabled, and there is no way to enable them without compiling it ourselves. If you are also using a OrangePi Zero 3, you can download and use the image I have already compiled (skip to the Flashing & Configuring the OS section). If you aren't using that device, or want to compile your own firmware, then continue to follow the guide. I promise it's not that hard, besides I've done all the hard work and researching for you.
OrangePi Zero 3 ImageIn order to make our own image, we need to build enviroment. The tools and scripts provided by OrangePi only support Ubuntu 22, so that is what we are going to use. I would reccommend spinning this up in a virtual machine, the desktop or server (minimal) versions both work fine. Once you are logged in, run the following commands:
git clone https://github.com/orangepi-xunlong/orangepi-build.git -b nextDownload the tools and script from OrangePi's official Githubsudo nano /orangepi-build/kernel/orange-pi-6.1-sun50iw9/arch/arm64/boot/dts/allwinner/sun50i-h618-orangepi-zero3.dtsIn this file, search fordr_mode = "peripheral"and change it todr_mode = "otg". Note that this specific file is only for the OPZ3. If you are following this guide for a different OrangePi device, look for the appropriate .dts file in the same directory. Use "ctrl+x" to close out of the file, and press "y" to save.cd ../../../../../../../Take us back to the top level directorysudo ./build.shRun the build script
A menu screen should appear. Because we want to build an entire OS, select the following options:
- Full OS Image for flashing
- Show a kernel configuration menu before compilation
- Orangepizero3 (or whatever board you are using)
- next Use the latest kernel
- jammy Ubuntu jammy 22.04 LTS (you don't have to use this, if you want to use a differet version of Ubuntu or Debian, I assume they would work just as well, but I have not tested them. I would not suggest the Raspberry Pi option.)
- no Image with console interface (server) (unless you have a screen connected to the OPZ3 and would like a desktop enviroment)
- no Standard image with console interface
The script will begin downloading the required packages, this process can take some time on the first run. Let it run untile a firmware configuration menu appears. You are going to want to find and enable the following options. Take note of the "*" and "M" before the option. Navigate the menu by using "Select" to go forward a menu page and "Exit" to go back a menu page. Once all the following options have been selected, "Save" and leave the default file name. Continue to select "Exit' until you leave the menu window.
 Device Drivers
    USB support
        <M>Inventra Highspeed Dual Role Controller
            MUSB Mode Selection
                (X)Dual Role mode
USB Physical Layer drivers
<M>NOP USB Transceiver Driver USB Gadget Support
[*] RNDIS USB Gadget precomposed configurations
<M>Mass Storage Gadget At this point the terminal should be very busy as the kernel is built, configured, and updated. This process took about 45 miutes for me.
Flashing & Configuring the OS
Once the OS is finished building, the .img file will be located in /orangepi-build/output/images/. Flash that .img file to the micro SD card using Balena Etcher or another flashing software. Insert the SD card into the OPZ3 and provide it power. It will automatically start booting.
At this point we need to connect to the OPZ3 over the network. In my case, I was permantly using an wired ethernet connection, however if you plan to use wifi, I would suggest connecting it via ethernet for now and following the next few steps, and you can switch over to wifi at a later point.
Once your device is connected to your network, you will need to find its IP address. You can usually do this inside your router, however that is outside the scope of this document. I would suggest Googling how to if you are unsure. The device is usually named "orangepi"
You now need to SSH into the OPZ3. If you are using mac or linux, the command ssh [email protected] will work, with x.x.x.x being the IP address of the OPZ3. The password is orangepi. If you are using windows, I would suggest downloading and using an application called PuTTY. Enter the IP address you found earlier as the address you wish to connect to and select OK/Yes if you get a security warning. When prompted on a black terminal window, enter orangepi as both your username and password.
Once logged in, I would suggest running the following commands to perform updates and change the default password, however these steps are optional.
sudo apt update && sudo apt upgrade -ysudo passwd orangepi
Setting up the USB Mass Storage Share
The first step is to decide how large you want the Mass Storage share to be. I would suggest making it no larger than 2/3 the size of the SD card you are using. For my case, I was using a 32GB SD card, and only wanted it to take up half of the space, so I made my share 16GBs. Once you decide how large you want your share to be, convert that number of GBs into MBs using the calculator here. For example, my 16Gbs was 16384MBs.
Run the following commands, replacing the value # with the number of MBs you calculated in the last step.
sudo dd bs=1M if=/dev/zero of=/piusb.bin count=#- Creates our storage file as the specified size. This will take some time to runsudo mkdosfs /piusb.bin -F 32 -I- Formats the storage file as FAT32.sudo mkdir /mnt/usb_share- Mounts the storage file so we can access it.sudo nano /etc/fstab- Open the configuration file-
/piusb.bin /mnt/usb_share vfat users,umask=000 0 2- Add the to the end of the file. "ctrl+x" to close and "y" to save. sudo mount -a- Reloads the fstab file we just modified
Testing
At this point the share should be working, but it's always a good idea to test it first. First run cd /mnt/usb_share and then wget https://site.fishnet.vip/images/gear.ctb to download a test .ctb file. Do NOT start a print using this file, as this is configured for my printer, but it will at least show up on your printer so you can verify it is working. You can also download any other test file you would like. Finally run sync to sync the file you downloaded to the storage file.
Run the command sudo modprobe g_mass_storage file=/piusb.bin stall=0 ro=1 to make your storage file available. If you are powering the OPZ3 from an external power source (a plug connected to the wall), you will need to modify your USB cable to prevent power from being sent into the device you are trying to connect to. If you are powering the OPZ3 from the same device you are connecting to (for example, if you are following along to do this with the Elegoo Saturn Printer), you can safely ignore the following modification.
Add a small piece of electrical tape to the 5v pin (labeled as 1) on the USB A side. Refer to the two pictures below.

Finally, plug in one side of the cable to the USB C port of the OPZ3 and the other side to the USB A port on the printer (or whatever device you are trying to connect to).
The printer (or other device) should now be seeing the virtual USB device! Note: If it doesn't show up, go back and ensure you have followed all previous steps, including ensuring that the USB cable is not damaged and is capable of sending and recieving data, and that the device you are connecting to can read the FAT32 format. Another note: during my testing, I was able to get the device to show up on a Ubuntu test machine and the Elegoo Saturn printer, but not my Macbook M1 laptop. This may be a configuration issue, but not that some devices will play better with this setup than others. Was not tried on Windows.
Once that is all working as expected, dismount the device by running sudo modprobe -r g_mass_storage.
Configuring SMB/Samba
This part is pretty easy and doesn't need much explanation. Perform the following steps.
sudo apt install samba winbind -y- Installs Sambasudo nano /etc/samba/smb.conf- Edit Samba configuration- Add the end of the file. "ctrl+x" to exit and "y" to save.
                                    [usb]
browseable = yes
path = /mnt/usb_share
guest ok = yes
read only = no
create mask = 777
sudo systemctl restart smbd.service- Restart samba service with new configuration.
Test out the samba share by navigating to share in your file browser. Will have to search for it via IP. You do not need credentials to access the share, a guest account or unauthenticated access should work.
Installing Watchdog
In order for the printer or other device to detect added or removed files from the samba share, we need to add a service that watches for those changes, and then disconnects and reconnects to the USB device to sync those changes. Run the following:
sudo apt install python3-pip- Installs Pip3 for Pythonsudo pip3 install watchdog- Installs Watchdogcd /usr/local/share- Change directorysudo wget http://rpf.io/usbzw -O usb_share.py- Downloads a python script to check for changessudo chmod +x usb_share.py- Gives the script permissions to runcd /etc/systemd/system- Change directory againsudo nano usbshare.service- Makes a new file for a new service.- Add to the file. "ctrl+x" to exit and "y" to save.
                                    [Unit]
Description=USB Share Watchdog

[Service]
Type=simple
ExecStart=/usr/local/share/usb_share.py
Restart=always

[Install]
WantedBy=multi-user.target
sudo systemctl daemon-reload- Reload the service daemon so it can see our new servicesudo systemctl enable usbshare.service- Enable our new service to run at bootsudo systemctl start usbshare.service- Start our new service now
That's it, you should be done! You can now add files via SMB, and in ~ 30 seconds they should show up on the connected device.
If you plan on using wifi with your OPZ3, now is the time to configure that. I would suggest this guide here